To understand how Gerrit works, let’s follow a change through its entire life cycle. This example uses a Gerrit server configured as follows:
-
Hostname: gerrithost
-
HTTP interface port: 80
-
SSH interface port: 29418
In this walkthrough, we’ll follow two developers, Max and Hannah, as they make and review a change to a RecipeBook project. We’ll follow the change through these stages:
-
Making the change.
-
Creating the review.
-
Reviewing the change.
-
Reworking the change.
-
Verifying the change.
-
Submitting the change.
|
Note
|
The project and commands used in this section are for demonstration purposes only. |
Making the Change
Our first developer, Max, has decided to make a change to the RecipeBook
project he works on. His first step is to get the source code that he wants to
modify. To get this code, he runs the following git clone command:
clone ssh://gerrithost:29418/RecipeBook.git RecipeBook
After he clones the repository, he runs a couple of commands to add a Change-Id to his commits. This ID allows Gerrit to link together different versions of the same change being reviewed.
scp -p -P 29418 gerrithost:hooks/commit-msg RecipeBook/.git/hooks/
chmod u+x .git/hooks/commit-msg
|
Note
|
To learn more about adding a change-id and the commit message hook, see the commit-msg Hook topic. |
Creating the Review
Max’s next step is to push his change to Gerrit so other contributors can review
it. He does this using the git push origin HEAD:refs/for/master command, as
follows:
$ <work>
$ git commit
[master 3cc9e62] Change to a proper, yeast based pizza dough.
 1 file changed, 10 insertions(+), 5 deletions(-)
$ git push origin HEAD:refs/for/master
Counting objects: 3, done.
Delta compression using up to 8 threads.
Compressing objects: 100% (2/2), done.
Writing objects: 100% (3/3), 532 bytes | 0 bytes/s, done.
Total 3 (delta 0), reused 0 (delta 0)
remote: Processing changes: new: 1, done
remote:
remote: New Changes:
remote:   http://gerrithost/#/c/RecipeBook/+/702 Change to a proper, yeast based pizza dough.
remote:
To ssh://gerrithost:29418/RecipeBook
 * [new branch]      HEAD -> refs/for/master
Notice the reference to a refs/for/master branch. Gerrit uses this branch to
create reviews for the master branch. If Max opted to push to a different
branch, he would have modified his command to
git push origin HEAD:refs/for/<branch_name>. Gerrit accepts pushes to
refs/for/<branch_name> for every branch that it tracks.
The output of this command also contains a link to a web page Max can use to review this commit. Clicking on that link takes him to a screen similar to the following.
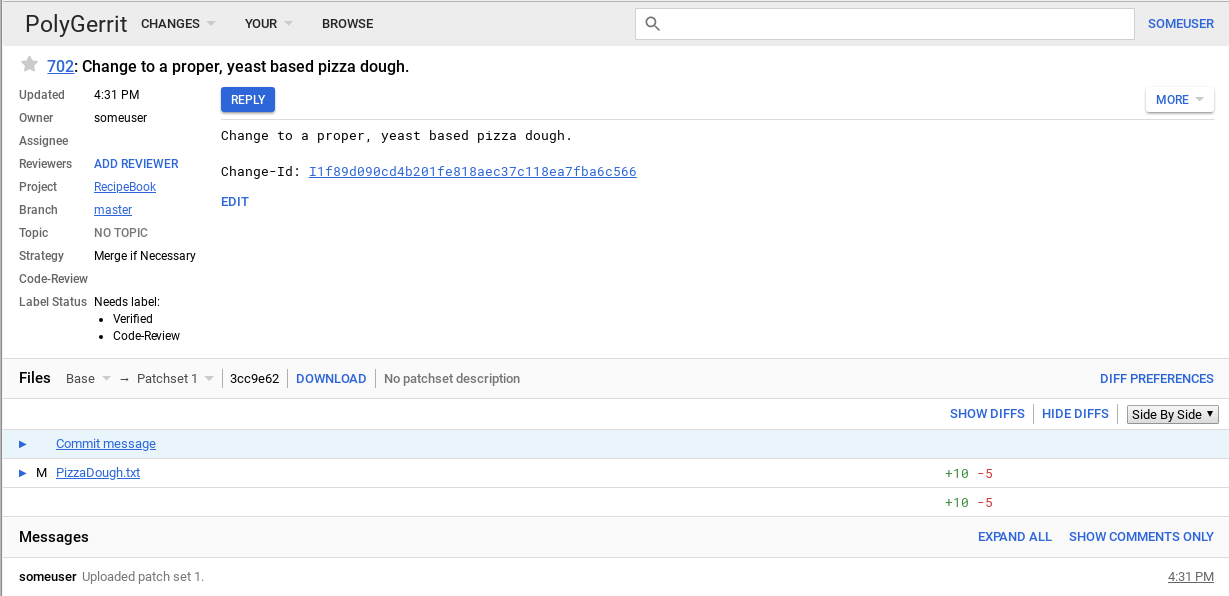
This is the Gerrit code review screen, where other contributors can review his change. Max can also perform tasks such as:
-
Looking at the diff of his change
-
Writing inline or summary comments to ask reviewers for advice on particular aspects of the change
-
Adding a list of people that should review the change
In this case, Max opts to manually add the senior developer on his team, Hannah, to review his change.
Reviewing the Change
Let’s now switch to Hannah, the senior developer who will review Max’s change.
As mentioned previously, Max chose to manually add Hannah as a reviewer. Gerrit offers other ways for reviewers to find changes, including:
-
Using the search feature that to find changes
-
Selecting Open from the Changes menu
-
Setting up email notifications to stay informed of changes even if you are not added as a reviewer
Because Max added Hannah as a reviewer, she receives an email telling her about his change. She opens up the Gerrit code review screen and selects Max’s change.
Notice the Label status section above:
Label Status Needs label:
             * Code-Review
             * Verified
These two lines indicate what checks must be completed before the change is accepted. The default Gerrit workflow requires two checks:
-
Code-Review. This check requires that someone look at the code and ensures that it meets project guidelines, styles, and other criteria.
-
Verified. This check means that the code actually compiles, passes any unit tests, and performs as expected.
In general, the Code-Review check requires an individual to look at the code, while the Verified check is done by an automated build server, through a mechanism such as the Gerrit Trigger Jenkins Plugin.
|
Important
|
The Code-Review and Verified checks require different permissions in Gerrit. This requirement allows teams to separate these tasks. For example, an automated process can have the rights to verify a change, but not perform a code review. |
With the code review screen open, Hannah can begin to review Max’s change. She can choose one of two ways to review the change: unified or side-by-side. Both views allow her to perform tasks such as add inline or summary comments.
Hannah opts to view the change using Gerrit’s side-by-side view:
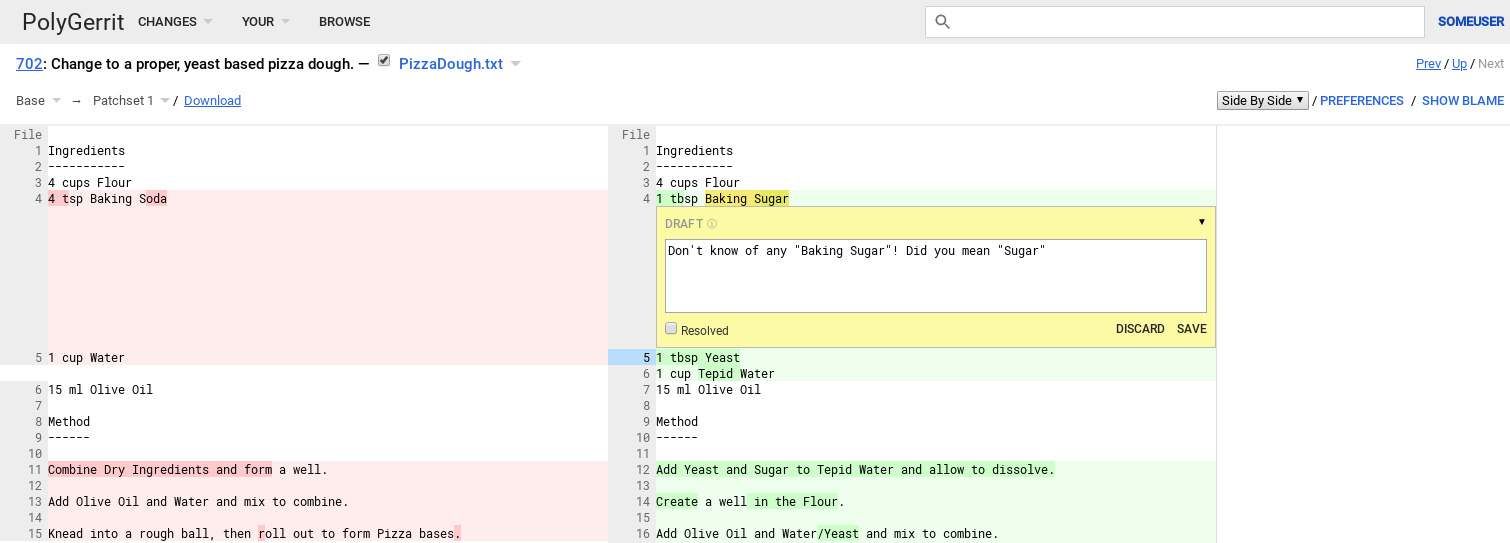
Hannah reviews the change and is ready to provide her feedback. She clicks the REPLY button on the change screen. This allows her to vote on the change.
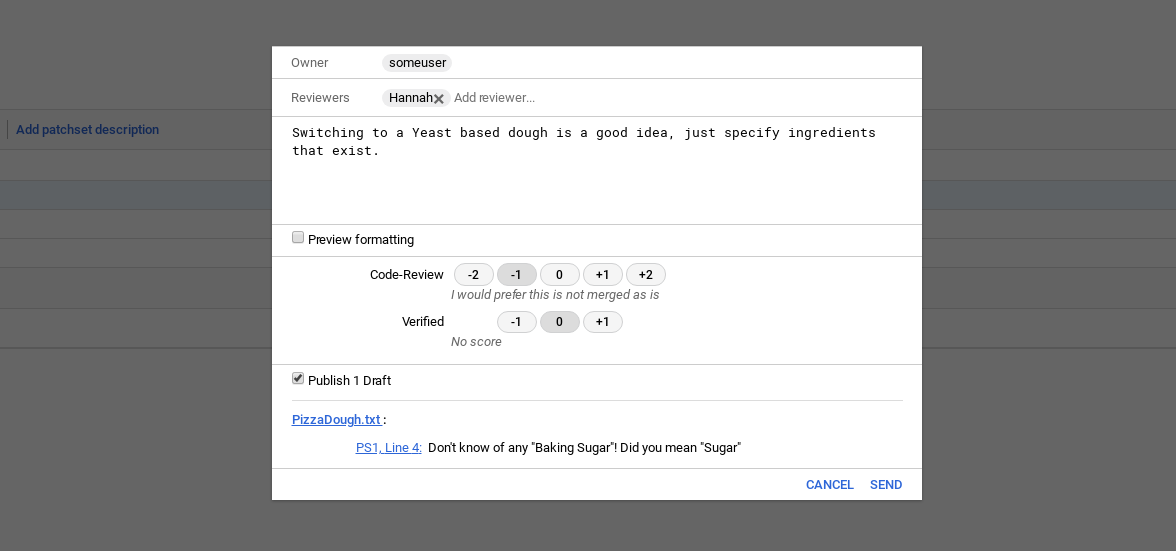
For Hannah and Max’s team, a code review vote is a numerical score between -2 and 2. The possible options are:
-
+2 Looks good to me, approved -
+1 Looks good to me, but someone else must approve -
0 No score -
-1 I would prefer that you didn’t submit this -
-2 Do not submit
In addition, a change must have at least one +2 vote and no -2 votes before
it can be submitted. These numerical values do not accumulate. Two
+1 votes do not equate to a +2.
|
Note
|
These settings are enabled by default. To learn about how to customize them for your own workflow, see the Project Configuration File Format topic. |
Hannah notices a possible issue with Max’s change, so she selects a -1 vote.
She uses the Cover Message text box to provide Max with some additional
feedback. When she is satisfied with her review, Hannah clicks the
SEND button. At this point, her vote and cover message become
visible to to all users.
Reworking the Change
Later in the day, Max decides to check on his change and notices Hannah’s feedback. He opens up the source file and incorporates her feedback. Because Max’s change includes a change-id, all he has to is follow the typical git workflow for updating a commit:
-
Check out the commit
-
Amend the commit
-
Push the commit to Gerrit
$ <checkout first commit>
$ <rework>
$ git commit --amend
[master 30a6f44] Change to a proper, yeast based pizza dough.
 Date: Fri Jun 8 16:28:23 2018 +0200
 1 file changed, 10 insertions(+), 5 deletions(-)
$ git push origin HEAD:refs/for/master
Counting objects: 3, done.
Delta compression using up to 8 threads.
Compressing objects: 100% (2/2), done.
Writing objects: 100% (3/3), 528 bytes | 0 bytes/s, done.
Total 3 (delta 0), reused 0 (delta 0)
remote: Processing changes: updated: 1, done
remote:
remote: Updated Changes:
remote:   http://gerrithost/#/c/RecipeBook/+/702 Change to a proper, yeast based pizza dough.
remote:
To ssh://gerrithost:29418/RecipeBook
 * [new branch]      HEAD -> refs/for/master
Notice that the output of this command is slightly different from Max’s first commit. This time, the output verifies that the change was updated.
Having uploaded the reworked commit, Max can go back to the Gerrit web interface, look at his change and diff the first patch set with his rework in the second one. Once he has verified that the rework follows Hannahs recommendation he presses the DONE button to let Hannah know that she can review the changes.
When Hannah next looks at Max’s change, she sees that he incorporated her
feedback. The change looks good to her, so she changes her vote to a +2.
Verifying the Change
Hannah’s +2 vote means that Max’s change satisfies the Needs Review
check. It has to pass one more check before it can be accepted: the Needs
Verified check.
The Verified check means that the change was confirmed to work. This type of check typically involves tasks such as checking that the code compiles, unit tests pass, and other actions. You can configure a Verified check to consist of as many or as few tasks as needed.
|
Note
|
Remember that this walkthrough uses Gerrit’s default workflow. Projects can add custom checks or even remove the Verified check entirely. |
Verification is typically an automated process using the Gerrit Trigger Jenkins Plugin or a similar mechanism. However, there are still times when a change requires manual verification, or a reviewer needs to check how or if a change works. To accommodate these and other similar circumstances, Gerrit exposes each change as a git branch. The Gerrit UI includes a download link in the Gerrit Code Review Screen to make it easy for reviewers to fetch a branch for a specific change. To manually verify a change, a reviewer must have the Verified permission. Then, the reviewer can fetch and checkout that branch from Gerrit. Hannah has this permission, so she is authorized to manually verify Max’s change.
|
Note
|
The Verifier can be the same person as the code reviewer or a different person entirely. |
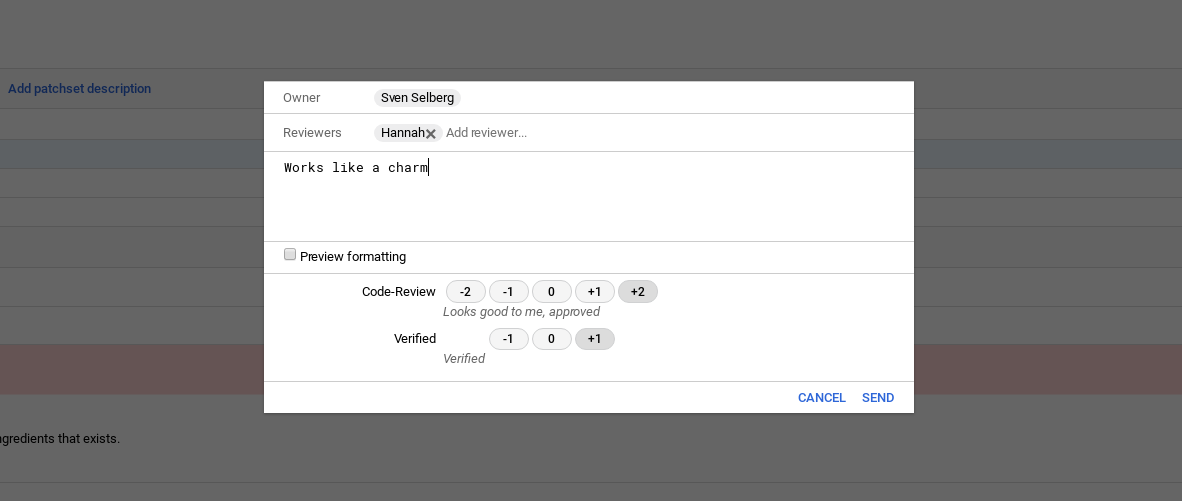
Unlike the code review check, the verify check is pass/fail. Hannah can provide
a score of either +1 or -1. A change must have at least one +1 and no
-1.
Hannah selects a +1 for her verified check. Max’s change is now ready to be
submitted.
Submitting the Change
Max is now ready to submit his change. He opens up the change in the Code Review screen and clicks the SUBMIT button.
At this point, Max’s change is merged into the repository’s master branch and becomes an accepted part of the project.
Next Steps
This walkthrough provided a quick overview of how a change moves through the default Gerrit workflow. At this point, you can:
-
Read the Users guide to get a better sense of how to make changes using Gerrit
-
Review the Project Owners guide to learn more about configuring projects in Gerrit, including setting user permissions and configuring verification checks
Part of Gerrit Code Review