Gerrit is a web-based code review tool built on top of the git version control system, but if you’ve got as far as reading this guide then you probably already know that. The purpose of this introduction is to allow you to answer the question, is Gerrit the right tool for me? Will it fit in my work flow and in my organization?
What is Gerrit?
It is assumed that if you’re reading this then you’re already convinced of the benefits of code review in general but want some technical support to make it easy.
Code reviews mean different things to different people. To some it’s a formal meeting with a projector and an entire team going through the code line by line. To others it’s getting someone to glance over the code before it is committed.
Gerrit is intended to provide a lightweight framework for reviewing every commit before it is accepted into the code base. Changes are uploaded to Gerrit but don’t actually become a part of the project until they’ve been reviewed and accepted. In many ways this is simply tooling to support the standard open source process of submitting patches which are then reviewed by the project members before being applied to the code base. However Gerrit goes a step further making it simple for all committers on a project to ensure that changes are checked over before they’re actually applied. Because of this Gerrit is equally useful where all users are trusted committers such as may be the case with closed-source commercial development. Either way it’s still desirable to have code reviewed to improve the quality and maintainability of the code. After all, if only one person has seen the code it may be a little difficult to maintain when that person leaves.
Gerrit is firstly a staging area where changes can be checked over before becoming a part of the code base. It is also an enabler for this review process, capturing notes and comments about the changes to enable discussion of the change. This is particularly useful with distributed teams where this conversation can’t happen face to face. Even with a co-located team having a review tool as an option is beneficial because reviews can be done at a time that is convenient for the reviewer. This allows the developer to create the review and explain the change while it is fresh in their mind. Without such a tool they either need to interrupt someone to review the code or switch context to explain the change when they’ve already moved on to the next task.
This also creates a lasting record of the conversation which can be useful for answering the inevitable "I know we changed this for a reason" questions.
Where does Gerrit fit in?
Any team with more than one member has a central source repository of some kind (or they should). Git can theoretically work without such a central location but in practice there is usually a central repository. This serves as the authoritative copy of what is actually in the project. This is what everyone fetches from and pushes to and is generally where build servers and other such tools get the source from.
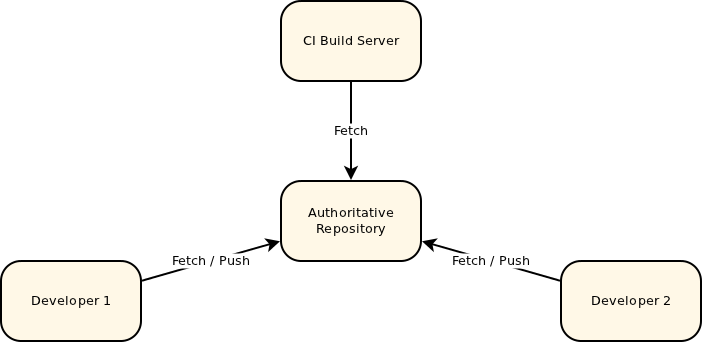
Gerrit is deployed in place of this central repository and adds an additional concept, a store of pending changes. Everyone still fetches from the authoritative repository but instead of pushing back to it, they push to this pending changes location. A change can only be submitted into the authoritative repository and become an accepted part of the project once the change has been reviewed and approved.
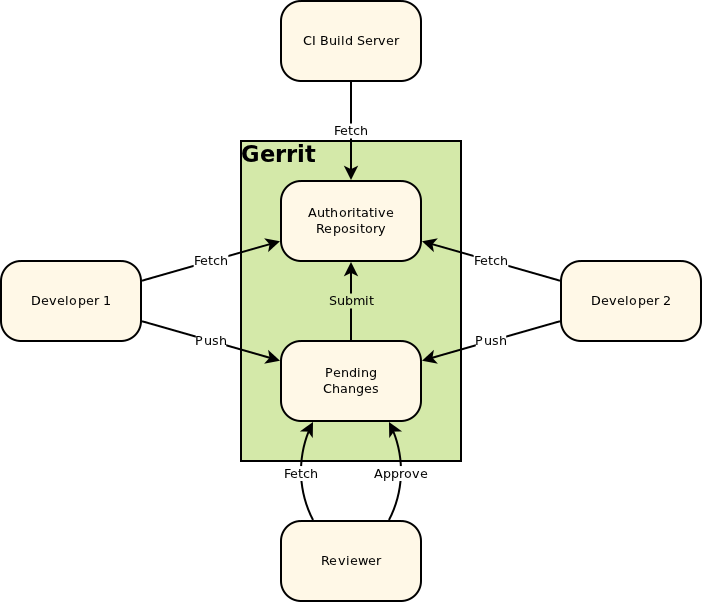
Like any repository hosting solution, Gerrit has a powerful access control model. Users can even be granted access to push directly into the central repository, bypassing code review entirely. Gerrit can even be used without code review, used simply to host the repositories and controlling access. But generally it’s just simpler and safer to go through the review process even for users who are allowed to directly push.
The Life and Times of a Change
The easiest way to get a feel for how Gerrit works is to follow a change through its entire life cycle. For the purpose of this example we’ll assume that the Gerrit Server is running on a server called gerrithost with the HTTP interface on port 8080 and the SSH interface on port 29418. The project we’ll be working on is called RecipeBook and we’ll be developing a change for the master branch.
Cloning the Repository
Obviously the first thing we need to do is get the source that we’re going to be modifying. As with any git project you do this by cloning the central repository that Gerrit is hosting. e.g.
$ git clone ssh://gerrithost:29418/RecipeBook.git RecipeBook
Cloning into RecipeBook...
Then we need to make our actual change and commit it locally. Gerrit doesn’t really change anything here, this is just the standard editing and git. While not strictly required, it’s best to include a Change-Id in your commit message so that Gerrit can link together different versions of the same change being reviewed. Gerrit contains a standard Change-Id commit-msg hook that will generate a unique Change-Id when you commit. If you don’t do this then Gerrit will generate a Change-Id when you push your change for review. But because you don’t have the Change-Id in your commit message you’ll need to manually copy it in if you need to upload another version of your change. Because of this it’s best to just install the hook and forget about it.
Creating the Review
Once you’ve made your change and committed it locally it’s time to push it to Gerrit so that it can be reviewed. This is done with a git push to the Gerrit server. Since we cloned our local repository directly from Gerrit it is the origin so we don’t have to redefine the remote.
$ <work>
$ git commit
[master 9651f22] Change to a proper, yeast based pizza dough.
 1 files changed, 3 insertions(+), 2 deletions(-)
$ git push origin HEAD:refs/for/master
Counting objects: 5, done.
Delta compression using up to 8 threads.
Compressing objects: 100% (2/2), done.
Writing objects: 100% (3/3), 542 bytes, done.
Total 3 (delta 0), reused 0 (delta 0)
remote:
remote: New Changes:
remote:   http://gerrithost:8080/68
remote:
To ssh://gerrithost:29418/RecipeBook.git
 * [new branch]      HEAD -> refs/for/master
The only different thing about this is the refs/for/master branch. This is a magic branch that creates reviews that target the master branch. For every branch Gerrit tracks there is a magic refs/for/<branch_name> that you push to to create reviews.
In the output of this command you’ll notice that there is a link to the HTTP interface of the Gerrit server we just pushed to. This is the web interface where we will review this commit. Let’s follow that link and see what we get.
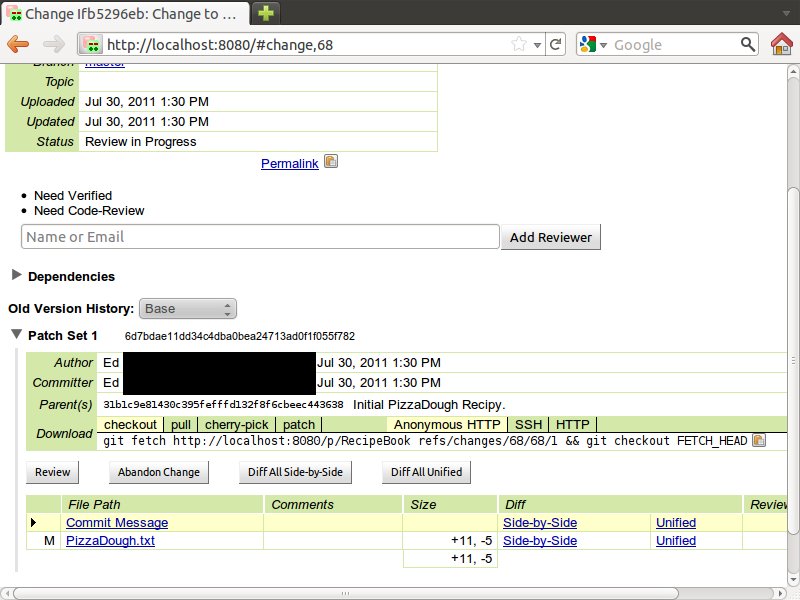
This is the Gerrit code review screen where someone will come to review the change. There isn’t too much to see here yet, you can look at the diff of your change, add some comments explaining what you did and why, you may even add a list of people that should review the change.
Reviewers can find changes that they want to review in any number of ways. Gerrit has a capable search that allows project leaders (or anyone else) to find changes that need to be reviewed. Users can also setup watches on Gerrit projects with a search expression, this causes Gerrit to notify them of matching changes. So adding a reviewer when creating a review is just a recommendation.
At this point the change is available for review and we need to switch roles to continue following the change. Now let’s pretend we’re the reviewer.
Reviewing the Change
The reviewer’s life starts at the code review screen shown above. He can get here in a number of ways, but for some reason they’ve decided to review this change. Of particular note on this screen are the two "Need" lines:
* Need Verified
* Need Code-Review
Gerrit’s default work-flow requires two checks before a change is accepted. Code-Review is someone looking at the code, ensuring it meets the project guidelines, intent etc. Verifying is checking that the code actually compiles, unit tests pass etc. Verification is usually done by an automated build server rather than a person. There is even a Gerrit Trigger Jenkins Plugin that will automatically build each uploaded change and update the verified score accordingly.
It is important to note that Code-Review and Verification are different permissions in Gerrit, allowing these tasks to be separated. For example, an automated process would have rights to verify but not to code-review.
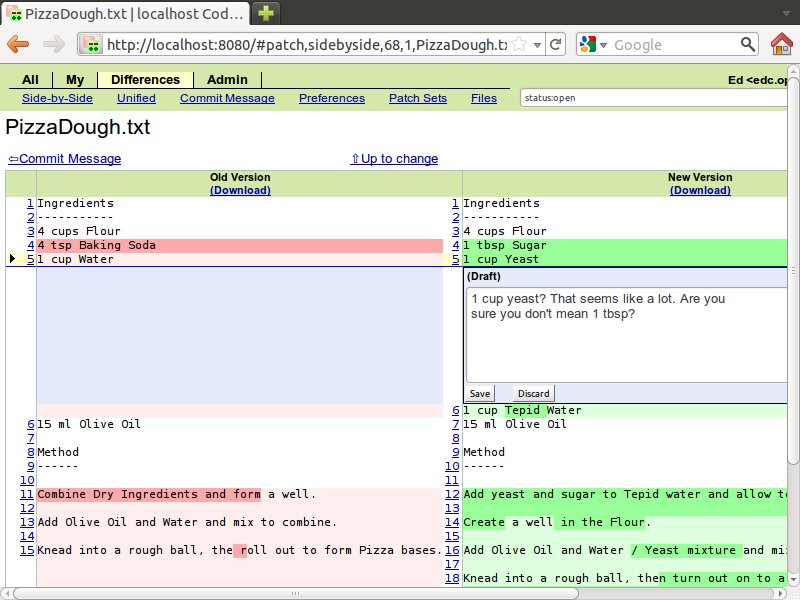
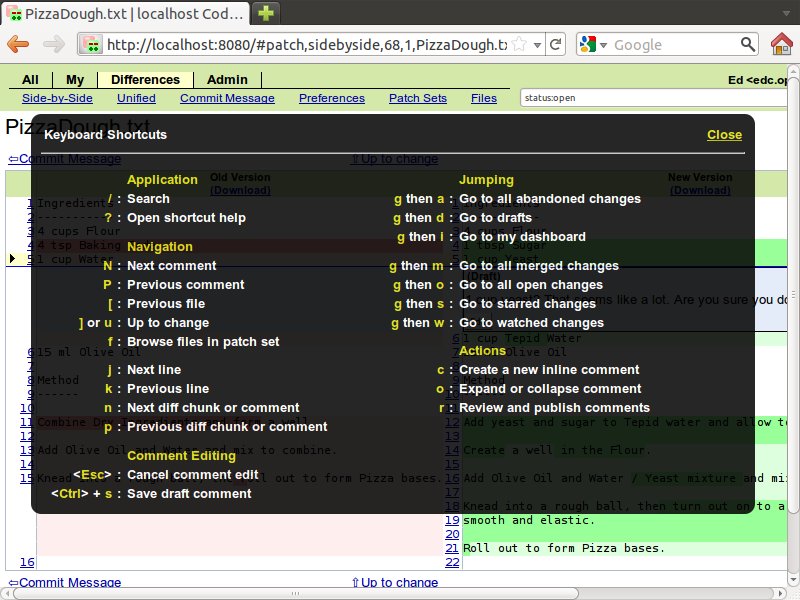
Since we are the code reviewer, we’re going to review the code. To do this we can view it within the Gerrit web interface as either a unified or side-by-side diff by selecting the appropriate option. In the example below we’ve selected the side-by-side view. In either of these views you can add inline comments by double clicking on the line (or single click the line number) that you want to comment on. Also you can add file comment by double clicking anywhere (not just on the "Patch Set" words) in the table header or single clicking on the icon in the line-number column header. Once published these comments are viewable to all, allowing discussion of the change to take place.
Code reviewers end up spending a lot of time navigating these screens, looking at and commenting on these changes. To make this as efficient as possible Gerrit has keyboard shortcuts for most operations (and even some operations that are only accessible via the hot-keys). At any time you can hit the ? key to see the keyboard shortcuts.
Once we’ve looked over the changes we need to complete reviewing the submission. To do this we click the Review button on the change screen where we started. This allows us to enter a Code Review label and message.
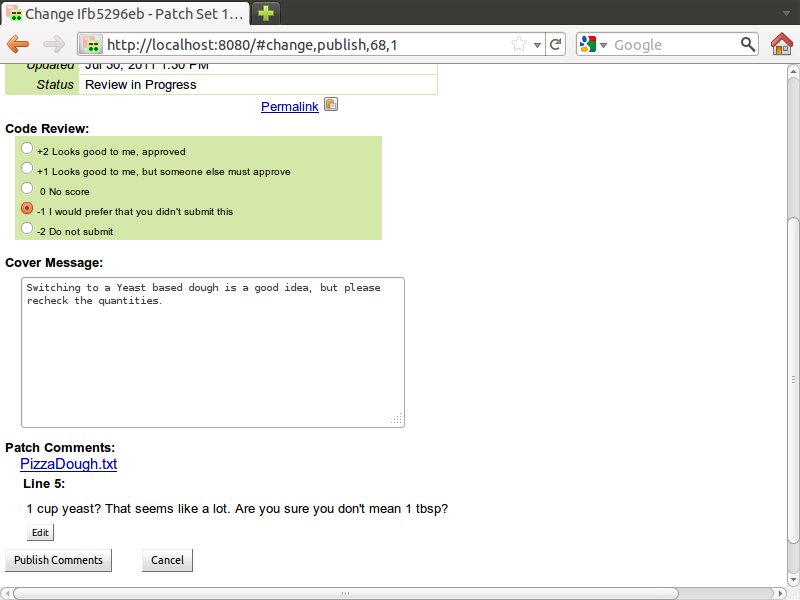
The label that the reviewer selects determines what can happen next. The +1 and -1 level are just an opinion where as the +2 and -2 levels are allowing or blocking the change. In order for a change to be accepted it must have at least one +2 and no -2 votes. Although these are numeric values, they in no way accumulate; two +1s do not equate to a +2.
Regardless of what label is selected, once the Publish Comments button has been clicked, the cover message and any comments on the files become visible to all users.
In this case the change was not accepted so the creator needs to rework it. So let’s switch roles back to the creator where we started.
Reworking the Change
As long as we set up the Change-Id commit-msg hook before we uploaded the change, re-working it is easy. All we need to do to upload a re-worked change is to push another commit that has the same Change-Id in the message. Since the hook added a Change-Id in our initial commit we can simply checkout and then amend that commit. Then push it to Gerrit in the same way as we did to create the review. E.g.
$ <checkout first commit>
$ <rework>
$ git commit --amend
$ git push origin HEAD:refs/for/master
Counting objects: 5, done.
Delta compression using up to 8 threads.
Compressing objects: 100% (2/2), done.
Writing objects: 100% (3/3), 546 bytes, done.
Total 3 (delta 0), reused 0 (delta 0)
remote: Processing changes: updated: 1, done
remote:
remote: Updated Changes:
remote:   http://gerrithost:8080/68
remote:
To ssh://gerrithost:29418/RecipeBook.git
 * [new branch]      HEAD -> refs/for/master
Note that the output is slightly different this time around. Since we’re adding to an existing review it tells us that the change was updated.
Having uploaded the reworked commit we can go back into the Gerrit web interface and look at our change.
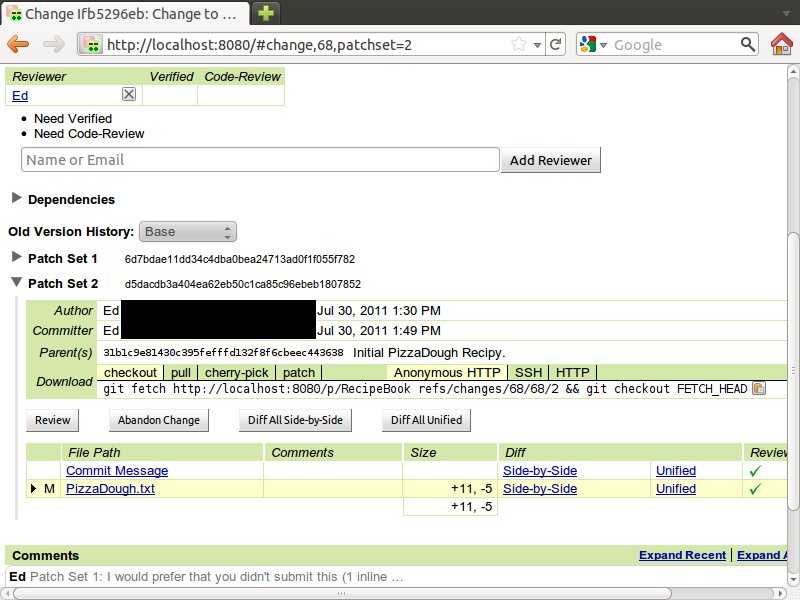
If you look closely you’ll notice that there are now two patch sets associated with this change, the initial submission and the rework. Rather than repeating ourselves lets assume that this time around the patch is given a +2 score by the code reviewer.
Trying out the Change
With Gerrit’s default work-flow there are two sign-offs, code review and verify. Verifying means checking that the change actually works. This would typically be checking that the code compiles, unit tests pass and similar checks. Really a project can decide how much or little they want to do here. It’s also worth noting that this is only Gerrit’s default work-flow, the verify check can actually be removed or others added.
As mentioned in the code review section, verification is typically an automated process using the Gerrit Trigger Jenkins Plugin or similar. But there are times when the code needs to be manually verified, or the reviewer needs to check that something actually works or how it works. Sometimes it’s just nice to work through the code in a development environment rather than the web interface. All of these involve someone needing to get the change into their development environment. Gerrit makes this process easy by exposing each change as a git branch. So all the reviewers need to do is fetch and checkout that branch from Gerrit and they will have the change.
We don’t even need to think about it that hard, if you look at the earlier screenshots of the Gerrit Code Review Screen you’ll notice a download command. All we need to do to get the change is copy paste this command and run it in our Gerrit checkout.
$ git fetch http://gerrithost:8080/p/RecipeBook refs/changes/68/68/2
From http://gerrithost:8080/p/RecipeBook
 * branch            refs/changes/68/68/2 -> FETCH_HEAD
$ git checkout FETCH_HEAD
Note: checking out 'FETCH_HEAD'.

You are in 'detached HEAD' state. You can look around, make experimental
changes and commit them, and you can discard any commits you make in this
state without impacting any branches by performing another checkout.

If you want to create a new branch to retain commits you create, you may
do so (now or later) by using -b with the checkout command again. Example:

  git checkout -b new_branch_name

HEAD is now at d5dacdb... Change to a proper, yeast based pizza dough.
Easy as that, we now have the change in our working copy to play with. You might be interested in what the numbers of the refspec mean.
-
The first 68 is the id of the change mod 100. The only reason for this initial number is to reduce the number of files in any given directory within the git repository.
-
The second 68 is the full id of the change. You’ll notice this in the URL of the Gerrit review screen.
-
The 2 is the patch-set within the change. In this example we uploaded some fixes so we want the second patch set rather than the initial one which the reviewer rejected.
Manually Verifying the Change
For simplicity we’re just going to manually verify the change. The Verifier may be the same person as the code reviewer or a different person entirely. It really depends on the size of the project and what works. If you have Verify permission then when you click the Review button in the Gerrit web interface you’ll be presented with a verify score.
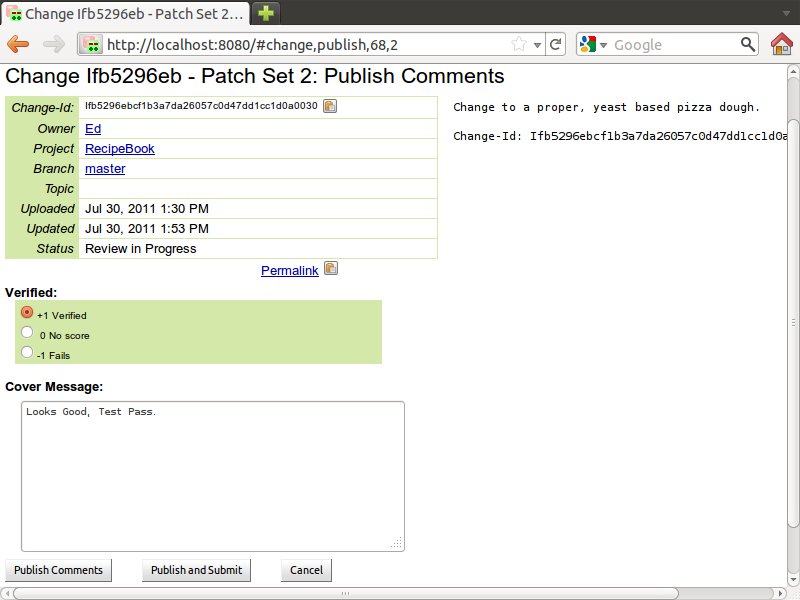
Unlike the code review the verify check doesn’t have a +2 or -2 level, it’s either a pass or fail so all we need for the change to be submitted is a +1 score (and no -1’s).
Submitting the Change
You might have noticed that in the verify screen shot there are two buttons for submitting the score Publish Comments and Publish and Submit. The publish and submit button is always visible, but will only work if the change meets the criteria for being submitted (I.e. has been both verified and code reviewed). So it’s a convenience to be able to post review scores as well as submitting the change by clicking a single button. If you choose just to publish comments at this point then the score will be stored but the change won’t yet be accepted into the code base. In this case there will be a Submit Patch Set X button on the main screen. Just as Code-Review and Verify are different operations that can be done by different users, Submission is a third operation that can be limited down to another group of users.
Clicking the Publish and Submit or Submit Patch Set X button will merge the change into the main part of the repository so that it becomes an accepted part of the project. After this anyone fetching the git repository will receive this change as a part of the master branch.
Part of Gerrit Code Review